


If you’re like me, you’ll agree that the initial design phase of a project can be time consuming, fraught with frustration and rarely meets client expectations at the first approval meeting. What if there was a better way to approach things? With Style Tiles, the newest kid on the design-methodology block, there is.
 Some say that the days of creating full mockups for webdesign projects in Photoshop are dying, if not outright dead. Others are saying that designing-in-the-browser isn’t all that it’s cracked up to be either. But are we all getting ahead of ourselves? Maybe it’s not the tool that we should be looking at but the entire way that we go about designing a new site and managing the client approval process.
In this tutorial, we’re going to be taking a close look at Style Tiles — a new way of thinking about the initial design stages, a design approach coined and conceived by the inimitable Samantha Warren. We’re going to be taking a look at what they are, why you should be using them and walking you through the process of how to create and implement a Style Tile for your next project.
The important thing to remember about Style Tiles is that they are not a literal representation of how the site will look; instead, they help define the mood, tone and ‘feeling’ of a site based on what you’ve learnt from the client in your initial kickoff meetings.
 Another thing to bear in mind is that the Style Tile approach is not a framework, defined process or even a tool. Instead, Style Tiles are built around a set of guidelines, techniques and approaches that allow you to focus on what is really important in the design (at least in the initial stages of a new project). Start by downloading a psd template to help you get started, but feel free to mold your Style Tiles to your own workflow and creative aesthetic.
 As you can see, the essence of the Tuts+ Premium site has been nicely captured in this Style Tile. We’ve attentively defined some of the design elements of the main orange presentation section of the site, as well as conveyed the feel and look of the blog posts (i.e. the tutorial listings).
Importantly, because the Style Tile is not presented for a particular screen size, orientation or even anything apart from “digital”, it’s easy to imagine how the site would look on any device from a desktop to a tablet to a smartphone.
 Pay particular attention to the adjective section of this Style Tile. All of the colors, typography selections and design textures in some way speak to these adjectives, ensuring that the Style Tile is consistent both in terms of design as well as tone and brand message.
Summing up, capture the overall direction of the site in your Style Tile, but feel free to flex your creative muscles.
Remember, our clients are generally not designers, but often know what they like, even if it’s only in general terms. Style Tiles are a perfect tool to allow the layperson to talk about the design as a whole without heaping on dozens of individual design elements which can quickly become confusing and overwhelming.
Not only do you need to factor in all of this cost into your final invoice, if you create three separate comps, that’s two-thirds of your time that’s going straight into the “Unused Resources” folder on your hard drive — not to mention two thirds of the client’s money for that portion of the final bill also going up in smoke.
With Style Tiles, on the other hand, it’s a very quick process to iterate different versions, and equally quick to make changes on the fly. Using Style Tiles means that you can streamline the design process, keep up the momentum at the early stages of the project and respond to change requests in minutes instead of hours.
To put this in perspective, the two example Style Tiles above took me about 20 minutes each (and would have taken 15 minutes each if I was better at naming my layers as I go).
Even if you create three perfect comps that you’d be proud to code, it is easy to become creatively blinkered. Style Tiles allow you to quickly experiment with different design concepts, and offer true design alternatives for the client based on their defined needs.
What do you present them with? A 960px wide desktop version? What about an iPad version? Don’t forget an iPhone version, too. Oh, but make sure that you also address Kindles, Blackberrys and the 500+ mobile Android devices that have been produced in just the last few years. And what about when they ask “How will this look on my favorite Palm Pilot that I’ve had since Bush was president?”
A better way of approaching the initial design phase of the project is to take the device completely out of the equation. The great thing about Style Tiles is that they are completely device agnostic.
Of course, you’ll need to address how the website will respond and/or adapt to different devices later on in the project, but in the initial phases, it simply muddies the waters to mix establishing an overall design direction with the website’s final functionality.
Whoa there, cowboy. Hold your horses! Well before starting to push pixels, we need to identify the client’s needs and objectives and translate them into concepts that allow us to form informed design decisions.
The four-step process in creating a Style Tile is as follows:
 This process of discovery is about much more than just asking them their favorite colors and what other websites they like on the ‘net. While we could easily have a whole tutorial on effective client questioning, here are a few discovery strategies to get you started:
Here are a few initial questions to warm up your client to talking about their business:
While people often find it difficult to translate abstract concepts and feelings into statements, people love to talk in metaphors – providing that you ask the right questions.
Here’s some questions that you can ask to get you started:
There are different ways to do this, but one effective approach is to have the client complete an interactive survey. With a little bit of creative HTML, CSS and Javascript, you can create a set of sliders that allow the client to position their brand between a range of dichotomies:
 Looking at this example, I’m already thinking about a fun, colorful retro-inspired design for our fictional client. What design concepts instantly jump to mind when you see this?
 Let’s take a look at an example. Here are a few statements that our fictional client says to you during the discovery phase:
Here are four adjectives that we could use to sum up the above statements, getting to the heart of what the client is really saying to us:
 Head on over to http://styletil.es and download the Photoshop template (or create your own).
The next steps are completely up to you. Get creative! I’m assuming that you already have a fairly good grasp of Photoshop, so I won’t walk you through each and every step (The Photoshop template is very easy to customize), but the main idea is to create a range of design elements (colors, textures, buttons, typography, etc) that speak to the adjectives that you arrived at in the previous step.
Want to delve deeper into how to create a color scheme and choose typography pairings for your Style Tile (and a lot more)? Here are a few Webdesigntuts+ articles for you to review:
 Remember, your adjectives may be the same for each Style Tile, but they may also be different — especially if you’ve found it difficult to breakdown your client’s needs or they’ve presented you with some different alternatives to explore as a part of the questioning stage.
For example, from our discovery questions from step two, we may have come up with three separate sets of adjectives that are all similar, but different enough to take different approaches to the design for our fictional client:
Your client should not be expecting you to present a full design comp only for you to pull out your Style Tiles. At the conclusion of the questioning phase, show your client examples of other Style Tiles that you’ve created, and explain their value for setting the design direction of the site.
Ensure that your client knows what you’ll be showing them before the presentation meeting!
Let your client talk freely about your design concepts, but ensure that you don’t let them off the hook too easily. Encourage your clients to expand upon their statements. With a bit of effective questioning, we can turn empty statements into exceptional statements:
Now that you’ve defined the direction of the design and the client has signed off on one of your Style Tile versions, you can be sure that your comp will be much closer to meeting your client’s expectations than if you jumped straight into opening up Photoshop after the initial meeting. Not only will the mockup be much closer to passing muster, there’s also no need to create multiple iterations of the design – that work has already been done with our Style Tiles.
Depending on how you like to approach your client work, these are all perfectly viable examples of workflow for the remainder of the project:
Style Tiles are a revolutionary way of approaching the design process and help you and your client form a clear direction for the website from even the most involved and complicated project.
What are your thoughts? Will you be using Style Tiles in your next project? We’d love to hear your thoughts in the comments!
In this tutorial, we’re going to be taking a close look at Style Tiles — a new way of thinking about the initial design stages, a design approach coined and conceived by the inimitable Samantha Warren. We’re going to be taking a look at what they are, why you should be using them and walking you through the process of how to create and implement a Style Tile for your next project.
[Style Tiles allow you to]… Present clients with interface choices without making the investment in multiple photoshop mockups. — Samantha WarrenReady to learn more? Let’s get started.
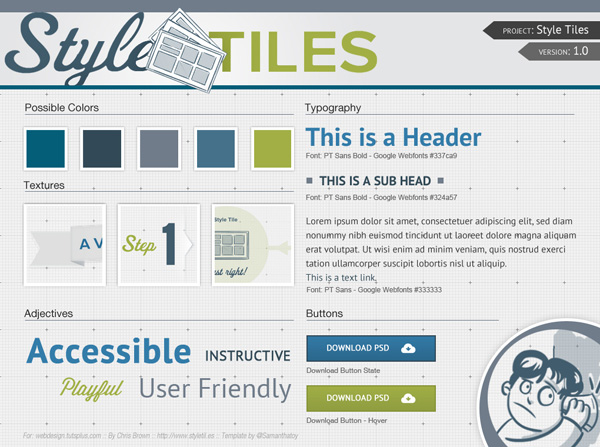
What Are Style Tiles?
In its simplest form, a Style Tile is a single page collection of common elements including colors, typography, textures, patterns and design features. Where an interior designer may present their client with a mood board comprising paint chips, fabrics and magazine clippings, the progressive web designer can present their stakeholders with a set of Style Tiles.The important thing to remember about Style Tiles is that they are not a literal representation of how the site will look; instead, they help define the mood, tone and ‘feeling’ of a site based on what you’ve learnt from the client in your initial kickoff meetings.
Examples
Let’s take a look at a couple of examples to show you a how Style Tiles can be presented. I reverse-engineered two sites to show you what their Style Tiles could have looked like in the initial design phases:tutsplus.com
This Style Tile is based on the recently revamped Tuts+ Premium site.Importantly, because the Style Tile is not presented for a particular screen size, orientation or even anything apart from “digital”, it’s easy to imagine how the site would look on any device from a desktop to a tablet to a smartphone.
styletil.es
For a bit of fun, here’s my interpretation of what the http://styletil.es site itself may have looked like at the initial design stage:Common Key Features
Let’s take a look at a few of the shared similarities of these two Style Tiles:- Client Logo: Just because they are not literal mock-ups, it doesn’t mean that we can’t brand them to the specific client. After all, this is professional client presentation!
- Possible Colors: A selection of the most important colors. You’re not restricted to five colors – feel free to use as many, or as few colors as the project calls for.
- Textures: Don’t confuse textures with Photoshop patterns. This area is used to cherry pick some key design elements that strongly convey a particular message. Think about textures more as design elements. You’ll see in the above Style Tiles example I’ve picked out the edge of a ribbon, a numerical header and a part of an illustration that all convey a particular message that speaks to the overall design direction of the project.
- Adjectives: Arguably the most important part of the Style Tile, the Adjectives section is a distillation of the most important words that describe the client, brand or website purpose. We’ll talk more about how to arrive at these adjectives a little later on.
- Typography: Use this section to define the site’s potential headings, paragraph text and links.
- Buttons: Both of these sites are trying to get the visitor to the site to perform a certain action: in the case of the Tuts+ site, it’s to get the user to sign up to the Premium program. In the case of Style Tiles, it’s for the user to download the Photoshop template. As such, in both of these cases, the “Call to Action” buttons on the final site are very important. For other sites where buttons are not as necessary (e.g. a blog), you could choose to omit this section and replace it with something else.
- Background: Whilst not necessary for a Style Tile, I’ve chosen to translate the background patterns of both sites into the Style Tile itself. Again, in both of the final sites, the background patterns are key design elements. Planning to keep the design simple? Just keep the background of the Style Tile as a neutral color.
- Version: Every Style Tile should carry the project name and the version number. This allows you to easily talk about the design with the client and reduce confusion (for example; “I like the colors from version 1, but prefer the buttons from version 3″).
Summing up, capture the overall direction of the site in your Style Tile, but feel free to flex your creative muscles.
Why Should I Use Style Tiles?
Style Tiles are not just another wishy-washy-best-practice-if-you-have-the-time-approach to collect dust at the bottom of your webdesign toolkit. They have a number of pretty awesome benefits for both you and the client when they are implemented correctly:Reduce Complexity and Clarify Objectives
More than anything, Style Tiles keep the initial design phase and client approval process simple.Presenting clients with a fully featured design comp after the first meeting runs the risk of missing the forest for the trees. Instead of the client getting hung up on small design features (“hmmm… I think the social buttons need to be a bit more ‘poppier’”), clients can talk confidently about how the overall design direction reflects their objectives (“I like how these colors give a feeling of trust, which is perfect for my Acme widget”).
Remember, our clients are generally not designers, but often know what they like, even if it’s only in general terms. Style Tiles are a perfect tool to allow the layperson to talk about the design as a whole without heaping on dozens of individual design elements which can quickly become confusing and overwhelming.
Save Time
Pixel-perfect mockups take time. Real time. Hours and hours of time.Not only do you need to factor in all of this cost into your final invoice, if you create three separate comps, that’s two-thirds of your time that’s going straight into the “Unused Resources” folder on your hard drive — not to mention two thirds of the client’s money for that portion of the final bill also going up in smoke.
With Style Tiles, on the other hand, it’s a very quick process to iterate different versions, and equally quick to make changes on the fly. Using Style Tiles means that you can streamline the design process, keep up the momentum at the early stages of the project and respond to change requests in minutes instead of hours.
To put this in perspective, the two example Style Tiles above took me about 20 minutes each (and would have taken 15 minutes each if I was better at naming my layers as I go).
Keep Your Own Standards High
I’m only speaking from experience here — each designer is different — but if you’re creating three separate Photoshop mocks, it’s not uncommon to create one that is perfect, one that is pretty good and one that is pretty average, and far from your best work. You present the three to the client, trying to sell them on your flagship design, and invariably they choose the one design that you like the least… and now you’re stuck coding a site that you’re not proud of and also isn’t in the best interest of the client, either.Even if you create three perfect comps that you’d be proud to code, it is easy to become creatively blinkered. Style Tiles allow you to quickly experiment with different design concepts, and offer true design alternatives for the client based on their defined needs.
Keep Initial Designs Device Agnostic
Okay, so let’s say that you don’t use Style Tiles, and you have chosen to present the client with a set of full design comps.What do you present them with? A 960px wide desktop version? What about an iPad version? Don’t forget an iPhone version, too. Oh, but make sure that you also address Kindles, Blackberrys and the 500+ mobile Android devices that have been produced in just the last few years. And what about when they ask “How will this look on my favorite Palm Pilot that I’ve had since Bush was president?”
Style Tiles don’t imply dimensions nor device; only that the design will be digital. — Samantha WarrenThe web is accessed in literally hundreds of ways today, each device with its own set of breakpoints, quirks and features.
A better way of approaching the initial design phase of the project is to take the device completely out of the equation. The great thing about Style Tiles is that they are completely device agnostic.
Of course, you’ll need to address how the website will respond and/or adapt to different devices later on in the project, but in the initial phases, it simply muddies the waters to mix establishing an overall design direction with the website’s final functionality.
How Do You Create A Style Tile?
Now that you’ve learnt what Style Tiles are, and you’re sold on the benefits of using them as an alternative to full design comps, I’m sure that you’re ready to crack open Photoshop and start creating your first Style Tile.Whoa there, cowboy. Hold your horses! Well before starting to push pixels, we need to identify the client’s needs and objectives and translate them into concepts that allow us to form informed design decisions.
The four-step process in creating a Style Tile is as follows:
- Listen
- Interpret
- Define
- Iterate
Listen
Whether you sit down in person with your client, talk to them on Skype or rely on email, you’ll always need to spend some real time and effort getting to know their business and their website goals. Failing to do so sends you down a dark, scary road of assumptions and guesswork that will almost always ensure an unsuccessful final result and an unhappy client.Understand Their Market, Business and Product
Everyone loves talking about what is important to them..Once you get a client talking about their business, you’ll often find it difficult to get them to stop. In fact, at this stage, the more talking they do about their business, the better it will be for the final result.
Here are a few initial questions to warm up your client to talking about their business:
- Who is your your typical customer? What type of person do you want to visit your site?
- Who are your competitors?
- What differentiates you from your competition?
- Where does your product / service fit in to the market (e.g. is it the cheapest / most expensive / highest quality / most innovative, etc.)
- What is important to your customers? (Try to get more than “a low price” – this is almost never the only important thing for an end user of any product or service).
- What action(s) do you want a visitor to your site to complete? (e.g. Sign up to a newsletter / buy a product / follow their Twitter account / etc.)
Get Out of the Box to Get to Straight to Their Needs
Once you’ve got some of the basic questions out of the way and you have a better understanding of their business, it’s time to dig a little deeper and really identify the needs of your client and pick out some key concepts that will help you create a design direction in the next step.While people often find it difficult to translate abstract concepts and feelings into statements, people love to talk in metaphors – providing that you ask the right questions.
Here’s some questions that you can ask to get you started:
- If you could choose any celebrity to endorse your brand, who would they be? What about them reflects your brand / product / service?
- If your product / service / brand was a brand of car, what would it be?
- If your product / service was a person, what television shows would he/she watch? What music would he/she listen to?
- If your product / service was a person, what sort of words would their best friend use to describe them? (e.g. “friendly”, “strong”/, “funny”, etc.)
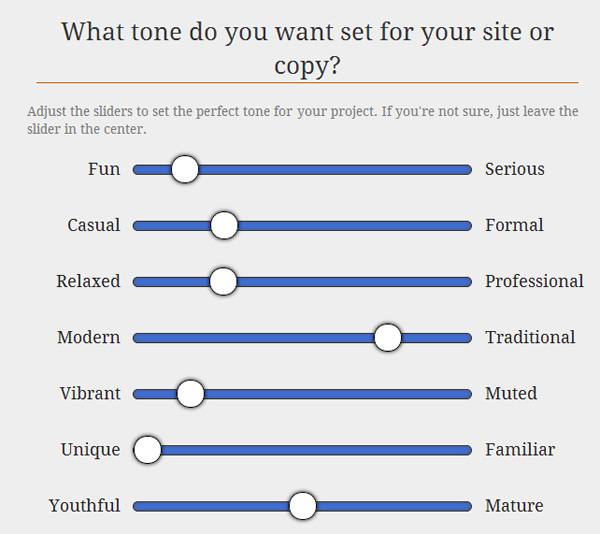
Establish the Right Tone for the Project
Once you’ve gotten to the core of the client’s project, it’s time to establish a baseline tone-of-voice for the overall design.There are different ways to do this, but one effective approach is to have the client complete an interactive survey. With a little bit of creative HTML, CSS and Javascript, you can create a set of sliders that allow the client to position their brand between a range of dichotomies:
Interpret
Once we’ve questioned our client, it’s time to distill the essence of the client’s project, product and needs for their website. The purpose of this part of the process is to define a selection of describing words that will populate the “Adjectives” section of our Style Tile.- “My product is complicated, and my customers are usually trying to learn more without getting more confused than they already are”
- “My competitors are all very serious. I want my site to be very different than their boring websites”
- “I want my visitors to my site to feel comfortable and to be not intimidated by the product”
- “My clients are mostly young women that don’t have a lot of patience for marketing speak or jargon”
Here are four adjectives that we could use to sum up the above statements, getting to the heart of what the client is really saying to us:
- To-the-point
- Fun
- Accessible
- Down to earth
Define
Phew! All talked out? Good news: We’ve done the grunt work, now we get to have some fun. Once we’ve boilded the entire discovery phase down to four-to-six dynamite adjectives, it’s time to create your first Style Tile.The next steps are completely up to you. Get creative! I’m assuming that you already have a fairly good grasp of Photoshop, so I won’t walk you through each and every step (The Photoshop template is very easy to customize), but the main idea is to create a range of design elements (colors, textures, buttons, typography, etc) that speak to the adjectives that you arrived at in the previous step.
Want to delve deeper into how to create a color scheme and choose typography pairings for your Style Tile (and a lot more)? Here are a few Webdesigntuts+ articles for you to review:
- An Introduction to Color Theory for Web Designers
- A Beginner’s Guide to Pairing Fonts
- Choosing the Right Font: A Practical Guide to Typography on the Web
- Principles for Successful Button Design
Iterate
Once you’ve created your first Style Tile, it’s time to clean the slate and iterate. There’s no set in stone number of versions you should create, but three to four Style Tiles for each project is probably a good balance between exploring sufficient independent design concepts and not overwhelming your clients with too many options.For example, from our discovery questions from step two, we may have come up with three separate sets of adjectives that are all similar, but different enough to take different approaches to the design for our fictional client:
Alternative Adjective Sets
- Version One: To the point, accessible, fun, down to earth.
- Version Two: Quirky, unique, informative, humorous
- Version Three: Friendly, familiar, relaxed, trustworthy
Presenting Style Tiles to the Client
Make sure your client knows what to expectNow that you’ve created your set of Style Tiles, it’s time to present them to your client. As with each step of this process, there are a number of strategies to implement to ensure that you get the best results and that your client is confident proceeding with the next steps of the project.
Your client should not be expecting you to present a full design comp only for you to pull out your Style Tiles. At the conclusion of the questioning phase, show your client examples of other Style Tiles that you’ve created, and explain their value for setting the design direction of the site.
Ensure that your client knows what you’ll be showing them before the presentation meeting!
Let your client talk freely about your design concepts, but ensure that you don’t let them off the hook too easily. Encourage your clients to expand upon their statements. With a bit of effective questioning, we can turn empty statements into exceptional statements:

- “I like this because I think you’ve captured the fun-loving nature of my brand”
- “I don’t like this because it reminds me too much of my competitor’s website and I want to set my business apart”
- “This design needs to pop more by adding in a bright pink color that my customers all love”
- “I don’t like this burgundy color because it makes my product seem old and stuffy”
- “Can you make it look more like Apple’s website because my customers are all technology focused early adopters”
What’s the Next Step?
Style Tiles are a better alternative to full design comps in the early stages of the project (i.e during the client approval process), but depending on how you like to work, a full mockup may be the next step for the project, if that is part of your established workflow.Now that you’ve defined the direction of the design and the client has signed off on one of your Style Tile versions, you can be sure that your comp will be much closer to meeting your client’s expectations than if you jumped straight into opening up Photoshop after the initial meeting. Not only will the mockup be much closer to passing muster, there’s also no need to create multiple iterations of the design – that work has already been done with our Style Tiles.
Depending on how you like to approach your client work, these are all perfectly viable examples of workflow for the remainder of the project:
- Style Tile > Wireframe > Mockup > Code
- Style Tile > Wireframe > Code
- Style Tile > Mockup > Code
- Style Tile > Code
Conclusion
Thanks for staying with me and reading all about the what, how and why of Style Tiles — I hope you enjoyed learning about them as much as I’ve enjoyed writing about introducing them to you!Style Tiles are a revolutionary way of approaching the design process and help you and your client form a clear direction for the website from even the most involved and complicated project.
What are your thoughts? Will you be using Style Tiles in your next project? We’d love to hear your thoughts in the comments!


0 comments:
Post a Comment
Note: Only a member of this blog may post a comment.